Showing posts with label centerpieces. Show all posts

Thursday, August 11, 2011

Decorative Butterfly Drink / Glass Place Card


This little project took me back...way back to a time when I enjoyed cutting out hearts and little paper people. I NEEDED them after seeing gold butterflies on a wedding show. I don't plan on using them for place cards..just some fancy pants glasses. No room in the budget for splurges.  So I just cut my own. It was so simple. I found a butterfly temple I liked. Folded my paper in half yep you guessed it cut with scissors :)


After some brief trial and error I came up with this template. Can't wait to start cutting on gold :)

Friday, July 22, 2011

Cheap Flower pots Fantastic :) MY Decoupage Adventure


I took advantage of a 75% off summer clearance and bought all my flower pots for my centerpieces .43 a piece for 10" pots. The down part they are plastic. don't even look real.  I spray painted them gold. They looked even cheaper than before.  What to do? Decoupage!!! I think my first one turned out fabulous. I can't wait to assemble my branch centerpieces.
Before 


How did I do this? Glue, white tissue paper, gold paint and a stamper.
Tutorial to come soon ! 
Yes, I cut the plastic rim off too.

Monday, June 27, 2011

Easy Paper Flower Tutorial


I am not sure right now what to call this flower I was originally going for a ranunculus. This kinda looks like a rose/ peony.


You will need: 


Scissors
Hot glue gun
Template
Pencil
Printer paper
Piece of foam(I used an egg crate...a pillow would work.)
Brats
rounded instrument (like the end of make up brush)


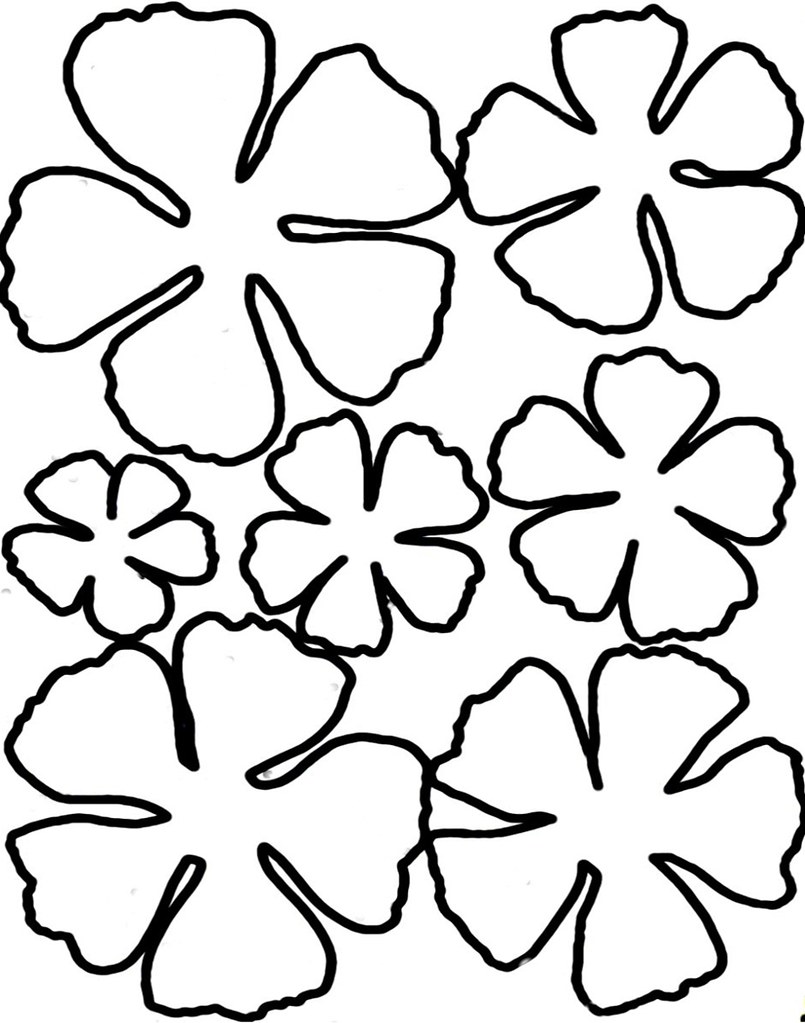
Templates:

Print your templates Make sure to "scale to fit page" when printing. I used decrease margins too.


Cut:

Use 2 sheets of paper for every flower. I can cut 8 flowers out at a time...but this will depend on your scissors. I also  cut on the out side line rather than inside...I like big flowers :)I know I sacrifice the top sheet! 
(((Important tip: NUMBER YOUR FLOWERS 1-7 One is the smallest flower and seven the largest )))
I am using my original hand drawn template here. I now cheat and use the printed one :)
Seven happy piles.


Shape:


This is where the magic happens. Get your foam and your round ended tool (I used a kid toy shhhhh)Working on the flat side.  Move the tool along the edge of your petals pressing fairly hard.

 
Like this :)
 Now you have piles of crinkled paper.

Form Your Flowers:
Get your brat and both of your 1 petals (the smallest) pierce them and secure the brat (your flowers center). 

You will be adding petals in this order 1,1,2,2,3,4,3,4,5,6,5,7,6,7
kinda cute


 Make a cabbage and glue the petals together. Be careful not to burn yourself!


Next add both petals #2 

You will end up with something like this.
Add layers to the "cabbage" by gluing the top of each petal and forming around your center. Gradually apply less glue to let the flower open.
Glue and press your flower down on each new layer.
Remember to over lap the layers or your flower will look funny.

Enjoy:

Who knew  just 2 pieces of printer paper could be so beautiful. You can add stems to your flowers by replacing the brat with floral wire and pierce through all the layers... Add stamens or a jewel.  

Monday, June 20, 2011

Paper Ranunculus Flower

I have been browsing for a solution to my flower budget dilemma. I think I have found it :) Paper ranunculus flowers. My inspiration from diy or don't ....unfortunately I don't own a fancy cutting machine and I don't have the extra $275 to spend on it. I do however own a pair of scissors and a hot glue gun. I made my own temple. Still working on making it perfect, but I think they turned out good. 

(The tutorial is finally here with pattern/ temple!)

Thursday, June 2, 2011

Stepping stone charger plates part 2

What a wonderful easy project this was! My 4 year old daughter did most of the hard work string and pouring :) It took me a few weekends of my life to complete. As easy as poring in pancake mix in a bowl. After using plaster of pairs and even adding glue for strength... it just was not hard enough to go out side. Well then I discovery quick setting cement.  It sets up in 10 minutes a dream compared to the 25 the plaster took. Faster stronger and CHEAPER! The total cost of a 150lb  was 6.00 and I was able to complete all of my plates for $12 plus the $10 for the mold. Grand total for 100 charger plates/ favors $22. Will my guests be mad I spent .22 cents on the favors?

Tuesday, January 18, 2011

New date new venue

After searching like a mad woman. I found the best location for my budget. An arboretum. This place is beautiful and hopefully it will look amazing for my November 5th wedding. Cost free  (my mother paid for it 300 for 3 day rental) Thanks mom :) 

Sunday, December 5, 2010

DIY Cupcake Stand ...Vintage Plates!


How cute would it be to have a cupcake stand out of vintage plates or even platers?
I was completely inspired by this vid  and gorilla glue  is my new BFF

Thursday, November 11, 2010

OMG! FOOD

DIY food is going to be a huge challenge. Thanks to ellenskitchen.com The site is beyond helpful! I actually think this can be done!


Our discussed menu so far.
hors d'oeuvres:
cheeses
fruit plater with chocolate fountain
Salami, prosciutto, pepperoni and other Italian meats
veggie platter with dip
bread and crackers
shrimp cocktail

Main Course:
Pasta with sauce
Meatballs
Chicken sausage
Green beans
Chicken leg quarters
Salt potatoes and butter
Salad
Bread

Dessert:
Cake
Italian cookies
chocolate covered strawberries

Tuesday, November 9, 2010

DIY Customized Unity Candle / Favor Candles


Why should I pay $60 for my customized candle that I am going to burn once?  I never knew you could make them your self for under $5. Yes, for real. Two very easy methods to do this one is with tissue paper an a hair dryer the other is with water slide decal paper and spray adhesive. Watch the videos below ...hopefully you will find them as helpful as I did.


Vintage Valentine Place Cards


Weddings are a day to celibate love. Why not give my guests a little love too...not in a dirty way! I, the crafty person I am decided to print out vintage valentines for my guests place cards. I originally was going to write names in the sand at the beach..but decided that it was too much work and the kids kept messing up my names. Eamon agreed that this was a fun approach to the transitional lets face it name tag. 

Candles Candles, And More Candles!


I am a craigslist wedding hunter! If you did not get the memo yet I am just a little crazy about bargains. I found 144 used votives and holders for $25. I bought them for $15. I froze them and cleaned out the wax and now have 144 squeaky clean candle holders :)
Now time to get the candles. So, many people use www.candle4less.com I can honestly say that this is a complete rip off! $50 shipping WTF? Even with the coupon coed I found the site sucks.

I found a very unexpected site to have amazing prices on candles (no coupon required for amazing deal) webstaurantstore.com I purchased 288 candles for 47.11 shipped. About .16 per candle not too shabby. I decided to sell 72 candles plus holders on craigslist.. I don't need 144 candles. when I am finished I will sell the other 72 with candles and sell the remanding 72 candles without holders. Will I end up making a profit off my wedding? Crazy!

Wednesday, August 18, 2010

DIY wedding flowers?!?

I love to save money. So, today I took a trip down to the florist to check out prices... I can't believe how much people spend on flowers!  For all the pieces I envisioned for my wedding I was quoted $5800.  Ya, I know... So DIY flower time. Flower ideas so far Roses garden and reg, Bells of Ireland, Green Hanging Amaranthus


I think I can do this!

A few important things about flowers:

2 options for centerpieces low or high ...cus people want to see and talk to each other.

Don't store flowers near fruit. I guess they have a chemical that causes them to ripen and die faster.

Don't pour water on your floral foam. Just drop it in and forget it!

Warm water not cold. Why warm? Flowers take up warm water more readily than cold.

Round bouquet + round body = even more round

Have lots of buckets

Keep your flowers cool and out of the sun

Greenery first.


Resources:

Cheap wholesale flowers with a decent rep :)
http://globalrose.com/

Ooodles of info!
http://www.floraldesigninstitute.com/page004.11.02.904.67.htm

My centerpiece inspiration
http://www.ehow.com/video_2274018_tools-making-tall-wedding-floral.html

How to ez boutonniere
http://www.monkeysee.com/play/1047-how-to-make-a-boutonniere

Flower care when you get it!
http://www.monkeysee.com/play/9515-caring-for-your-flowers-for-your-centerpiece

Foam Foam and more foam!
http://www.monkeysee.com/play/9194-introduction-to-fresh-flower-foam

How to cascade bouquet
http://www.ehow.com/video_5361493_instructions-cascade-bridal-bouquet.html